I came across a good tutorial on photoshop's burn, dodge, and sponge tool. See
bloomu.edu. Here I am going to work with just the burn tool to darken the background and then to eliminate it.
From the tool bar select the burn tool. In Fireworks the tool is located right below the pencil tool. You may have to hold down the mouse on the tool as there are several options to choose from to get the burn tool.
The tutorial explains the parameters for the burn tool. Needless to say, you can adjust the size of the burn, its shape and darkness by changing the parameters. It is also important to know that the burn tool is like a brush in that with each application it burns the applied area. So, if you want a consistent burn over an area, keep the mouse down as you sweep the tool over the desired

area.
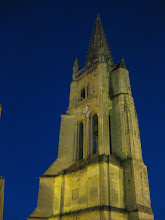
The burn tool darkens the background in the photo to highlight your subject. It is also possible to replace the backgroung using the magic wand to change the background color or clear pixels to cut out your subject and place into another photo. I will keep it simple here and just put a blue gradient background on the photo.
But, the possibilities are endless. Imagine clearing the blue pixels and then placing the figure into another photograph. Note, that you will have to have the canvas in a transparent png or gif in order to make this work.